How to Start Recording: A Beginner’s Guide
Recording your own music is more accessible than ever – a modest studio setup in your home can produce platinum records! Don’t believe us? Check out this video talking about how Bon Iver used a single SM57 mic to make his debut hit record. Of course, you can make recording as basic or advanced as you want, but either way Tone Tailors is here to guide you through how to start recording.
Check Out All Our Recording Gear In Stock!
The Modern Recording Artist
There are nearly endless approaches to recording music, many of which have been pioneered throughout the golden age of the ‘50s and ‘60s with studios like Abbey Road. Luckily, you don’t need a professional studio to get amazing results in your own home with some essential recording gear:
(Without getting too far into the weeds, the first thing you’ll need is a decent computer with a Digital Audio Workstation or DAW for short. There are lots of options, but each will accomplish the same thing with variations in workflow and stock plugins (which we’ll address later). Apple Users have access to GarageBand for free, or the more advanced version called Logic Pro X. In many cases, the cross-platform industry standard is Pro Tools, which is an Avid Product. Other DAWs like Ableton and Cubase remain popular with EDM producers or musicians who like to use samples and bring their studio sounds live. There are free DAWs out there just to get you started, which a quick Google search should reveal.)
The Connection Between Your Ideas and Your Recordings…
The single most essential piece of gear when wondering how to start recording is your audio interface. Tone Tailors stocks a variety of interfaces from well known brands like Focusrite, Universal Audio, and IK Multimedia. Each of these interfaces come with an entry level versions of recording software and some additional plugins. No matter which interface you choose, you’ll have access to pristine analog to digital conversion of your audio source. However, if you’re looking to build a professional-grade studio, contact us and we can discuss which interface options may be better for you!
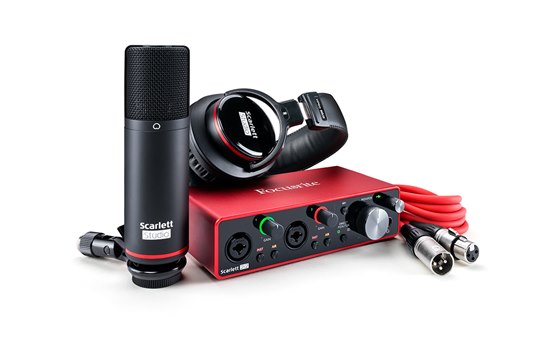
Nearly all of the interfaces we stock have the ability to record microphones and instrument level sources. Whether you want to track vocals, keyboards, guitars, bass, or drums there’s an interface that will fit your workflow. Having the right cables for the job is essential to ensure you have input signals with low-noise and a strong connection. Warm Audio makes great, affordable studio grade cables, as does Mogami, however beginners on a budget can get started with our Hosa cables too.
Recording Your Guitar Directly
If you’re just learning how to start recording, we recommend that you have at least a 2 channel interface with connections for XLR and 1/4” cables. This will allow you to run microphones and line level signals. If you want to record your guitar for amp models in your DAW, be sure to select an interface with a “Hi-Z” input to ensure you have the right impedance for the best results. One of the newest products from IK Multimedia the TONEX is designed to help you get the most out of recording your guitar directly to your computer. Recording with a Hi-Z input also ensures that you can reamp your guitar signal to a real guitar amp should you decide to do so down the line.
The Audio is Coming In, Now How Do I Get It Out?
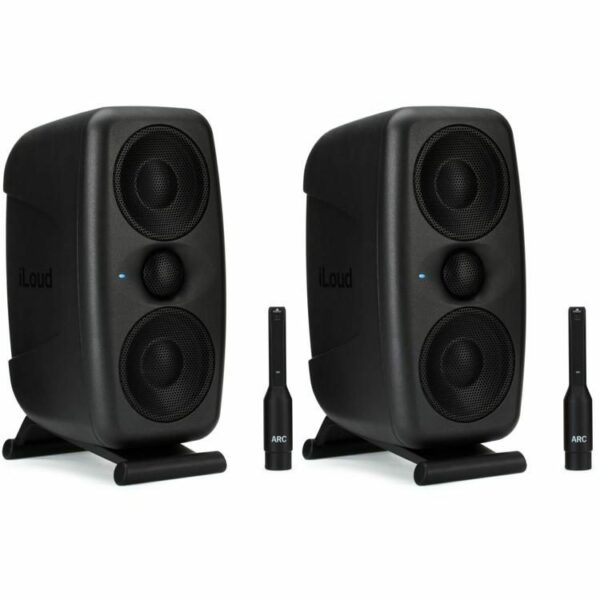
So now that you’ve got signal coming into your computer, it time to think about how to get it back out with speakers or headphones. Choosing your speaker setup is highly dependent on the size of your room and the limitations of your space. 6-inch studio monitors are great for most bedroom or home recording setups when just getting started. However if you plan to mix in a larger space or with your speakers away from a wall, larger monitors might be better. Again, contact Tone Tailors to see what is a good fit for your setup!
If you have a particularly live room, or one with a lot of reverberation, sound treatment often makes sense. Gator makes affordable paneling that can cut down on reflections to make sure that what you’re hearing in your DAW translates to the real world.
Get the Sound in Your Head…
Another option would be to invest in some professional level headphones, that way you can hear what you’re doing without the interference of the room or outside noise. In all honesty, having both monitors and decent headphones is what nearly all professional mix engineers will do just to cross-check their work. If you’re absolutely serious about making sure you’re hearing exactly what is happening in your mix, we also recommend some room correction software like IK Multimedia’s ARC 3 System.
The Nitty Gritty of Mixing…
In most cases, your recording software will come with a lot of incredibly powerful plugins like EQ’s, compressors, delays, and reverbs to allow you to start producing music. However, if you want to go for a very specific sound there are endless third-party plugins out there. We won’t get into this topic here because it’s just too vast! Just know that programs like Logic, Ableton, and Pro Tools among others have enough to make a hit record with just their stock plugins!
If you’re just learning how to start recording it’s important not to be overwhelmed by the process. Mixing music can be as simple or complex as you want to make it, so long as it’s serving to bring your vision to life! For now, focus on getting good performances of your song and remaining creative and free-flowing. Having the right gear from the beginning makes that all the more possible!
Here are some quick tips to keep in mind, that may not always be true, but serve as good starting practices:
- Keep your input signals between -18 dB and about -6 dB so you have plenty of room throughout mixing.
- If your song has an even tempo, record to a click! This makes editing much easier in the long run.
- If you hear buzzing or a hum in your signal, try to identify the source or just a ground lift in your signal chain.
- Check to see if there is a low-latency mode in your DAW. This ensures that your performances track as you intend them too.
- Always record the settings of your interface, guitar pedals, or the position of your mics just in case you want to recreate some of the magic or similarly avoid mistakes for the future!
- Regularly back up your recordings – the worst feeling is losing a masterpiece!
- Record like there’s no mixing process, and mix like there’s no mastering process AKA “Fix it in Preproduction.”
If you’re ready to learn how to start recording and need help, feel free to reach out to Tone Tailors and we can make sure you’re on the right path to production!